
JUMP TO A SECTION
Ice and water shield is a self-adhering rubberized membrane installed directly on the roof deck, underneath everything else, in the specific spots on a roof where water is most likely to back up or drive in sideways. It is not the same product as the underlayment that covers the rest of the deck, and it is not optional in the zones where Michigan's climate makes it necessary. Most callback leaks we trace on newer roofs come back to one thing: this membrane missing or falling short in a place it needed to be.
01 / THE SHORT ANSWERWhere ice and water shield goes on a Macomb County roof
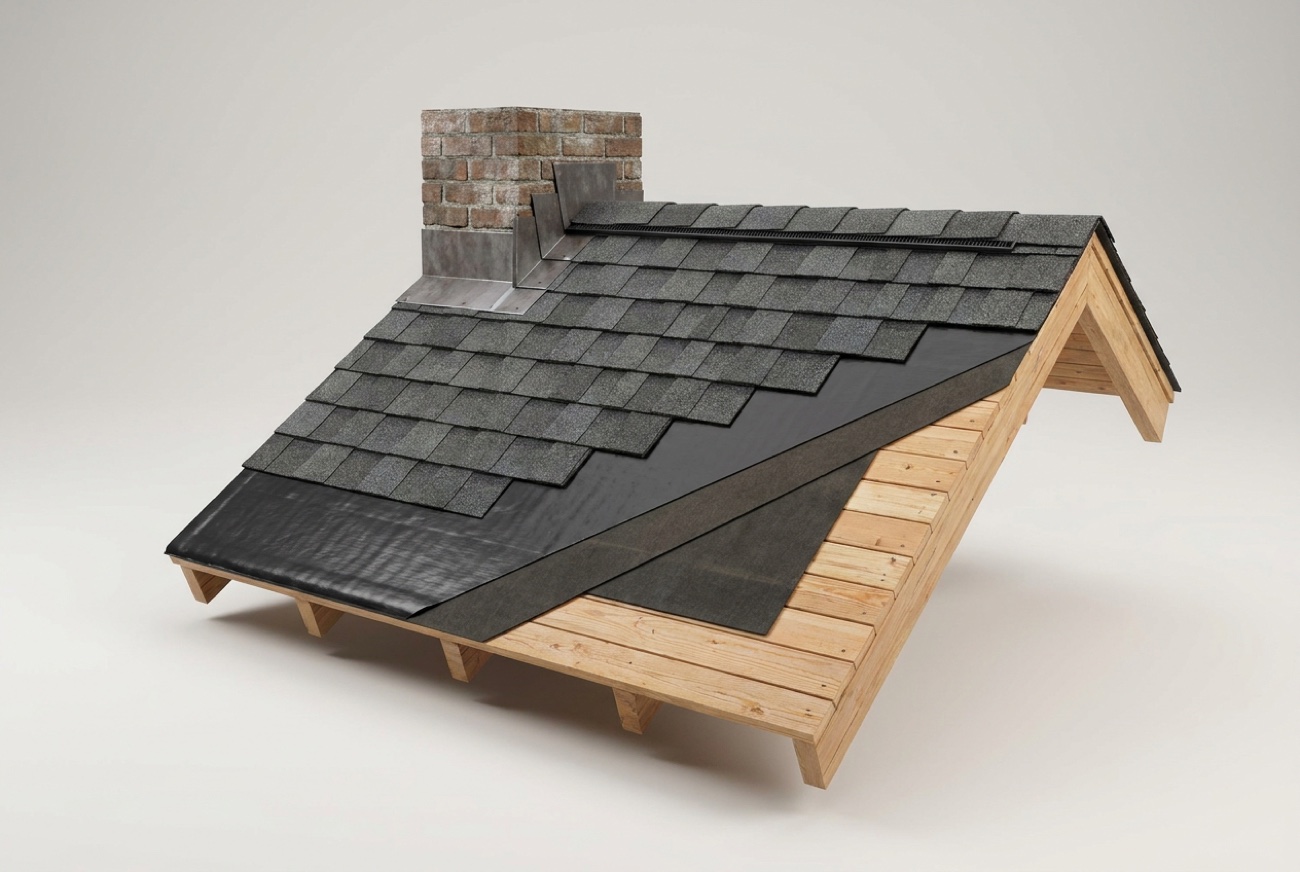
On a proper Michigan reroof, ice and water shield covers four zones: the eaves, extending up and over the exterior wall line by the code minimum; every valley, full length; around every roof penetration such as chimneys, skylights, and large vent stacks; and any low-slope transition where water moves slowly enough to find a seam. Everywhere else on the field of the roof, standard underlayment does the job. This page is a placement map for those four zones and what to verify is actually in your replacement quote.
Eaves past the warm-wall line, full-length valleys, around every penetration, and low-slope transitions. If a quote does not name these zones by name, ask where the ice barrier goes before you sign.
02 / THE WHYWhy this membrane exists in the first place
Ice and water shield solves two different problems with the same product. The first is ice dam backup. Attic heat melts the underside of the snowpack, meltwater runs down to the cold overhang, refreezes at the eave, and the growing ice dam forces standing water to back up under the shingles above it, sometimes by a foot or more. Ordinary shingle laps rely on gravity and roll off water moving downhill; they do nothing to stop water that is pushing uphill under pressure. The self-adhering membrane seals around every nail that penetrates it, so water trapped above the ice dam has nowhere to enter.
The second problem is wind-driven rain, which matters most in valleys and around penetrations. A valley collects the runoff of two roof planes at once, so it is carrying far more water per square foot than the open field, and any wind pushes that water sideways under the shingle laps rather than straight down them. Chimneys, skylights, and vent stacks are simply holes cut in the roof plane, and every hole is a seam an ordinary shingle course cannot seal on its own. Both situations call for a membrane that seals to itself and to the deck, not one that only sheds water moving in one direction.
03 / THE PLACEMENT MAPThe four zones, one at a time
Eaves, past the warm-wall line
The membrane starts at the edge of the roof and runs up the slope far enough to clear the point where the exterior wall meets the attic, sometimes called the warm-wall line. Stopping the membrane exactly at the fascia, or a foot short of the wall line, is a common corner-cut, because it looks identical from the ground and from most photos. It only fails the first winter an ice dam actually forms above where the membrane ends, which is precisely the point of installing it in the first place.
Valleys, full length
Every valley on the roof gets membrane running its entire length, from ridge to eave, wide enough to extend well up both adjoining roof planes. A valley that only gets membrane for part of its run, or one where two shorter pieces do not overlap enough at the seam, has effectively created a gap exactly where the roof is carrying the most concentrated water. Our guide to open versus closed roof valleys covers the metal and shingle detailing that sits on top of this membrane.
Every penetration: chimneys, skylights, vent stacks
Anywhere a chimney, skylight curb, plumbing stack, or roof-mounted vent breaks the roof plane, membrane wraps the base of that penetration before flashing goes on. This is what gives the flashing something continuous to seal against, rather than relying on caulk and a single layer of shingle to bridge the gap. Skylights in particular deserve their own membrane detail rather than a shortcut off the surrounding field, which is one reason skylight timing matters at reroof; see our guide on replacing skylights with your roof if that applies to your project.
Low-slope transitions and dead valleys
Where a steep roof plane transitions to a low-slope section, or where two roof planes create a dead valley with almost no pitch, water moves slowly and sits longer than it does on the open field. Standard shingle underlayment is built around water shedding downhill at a normal roof pitch; on a nearly flat transition it is not enough on its own. These sections typically get the full membrane treatment rather than field underlayment, the same way eaves and valleys do.
04 / THE CODE MINIMUMWhat Michigan code actually requires
Michigan's residential code sets a minimum for how far the ice barrier membrane must extend up the roof slope from the eave edge, measured from the interior wall line, in areas with a history of ice forming along the eaves. That code minimum is the floor, not the goal. A house with a complex roofline, a shallow overhang, or a history of ice dams can reasonably call for more membrane at the eave than the code minimum alone, and a contractor who has actually seen the attic and the eave detail is in a better position to say so than a generic quote.
The exact code language and the eave distance it specifies is a matter of public record, not a company standard, and we would rather point you to the source than paraphrase it into something looser. See the sources list at the end of this guide for the specific section.
05 / VERIFY YOUR QUOTEWhat to look for before you sign
A quote that names ice and water shield as a line item is not automatically a complete one. The specifics that matter are which zones it covers, and whether the eave run clears the wall line rather than stopping at the fascia. If a written quote says only "underlayment included" with no separate ice barrier line at all, ask directly where the ice and water shield goes on your roof, because on most Michigan homes the answer should include more than one zone.
| ZONE | WHAT SHOULD BE THERE | WHY IT MATTERS |
|---|---|---|
| Eaves | Membrane past the warm-wall line | Stops ice dam backup from reaching the deck |
| Valleys | Full-length membrane, both planes | Handles concentrated, wind-driven runoff |
| Penetrations | Base wrap under all flashing | Gives flashing a continuous seal to work against |
| Low-slope areas | Full membrane, not field underlayment | Water sits longer where pitch is shallow |
This is a fair checklist to run against any bid you are comparing, alongside the broader component list in our parts of a roof guide. If you want the difference between this membrane and the underlayment that covers everything else spelled out in more detail, our companion guide on what roof underlayment does covers that line item specifically rather than repeating it here.
06 / THE FEBRUARY PROBLEMWhat skimping here looks like, months later
The trouble with a shorted ice barrier is that it is invisible for months at a time. A roof installed in July with membrane that stops a foot short of the wall line looks and performs identically to a correct one through summer, fall, and even a mild early winter. The failure shows up the first time a real ice dam forms, the meltwater backs up past where the membrane ends, and a homeowner who just paid for a new roof finds a stain spreading across a bedroom ceiling in February. At that point the fix is not a quick patch; the affected section of roof has to be opened back up to extend the membrane correctly, which is exactly the rework nobody wants on a roof that is only a few months old.
An ice barrier that stops short of the wall line looks fine for eleven months of the year. It only has one job, and it either does it during the next ice dam or it does not.
This is also why we treat ventilation as part of the same conversation rather than a separate one. A well-vented attic keeps the deck cold and even, which shrinks how much ice dam actually forms in the first place. Ice and water shield is the backstop for the ice dams that still happen despite good ventilation, not a substitute for it.
07 / GETTING IT VERIFIEDHow to confirm it on your own roof
If your roof was replaced by someone else and you want to know what is actually under the shingles, an inspection can check the visible evidence: how the eave line and valleys are detailed, whether flashing at penetrations looks integrated with a membrane base or just caulked over the surface, and whether there is any sign of past ice dam staining in the attic that would suggest the membrane fell short somewhere. If you are planning a full roof replacement, this is one of the specific items worth asking any contractor to walk you through zone by zone before work starts, not after.
Our own process makes this a named step rather than an assumption. The full walkthrough, from the initial inspection through final walkthrough, is in our roof replacement process guide, and ice and water shield placement is one of the items we confirm and photograph on every reroof, alongside decking, flashing, and ventilation. Pricing for a full replacement in Macomb County runs $9,000 to $18,000 installed, with most homes landing $12,000 to $16,000, and that figure already assumes correct ice barrier placement rather than treating it as an upgrade, as shown on our honest pricing page. You can see the full breakdown in our roof replacement cost guide, get a ballpark for your own roof with the 60-second cost calculator, or start an instant estimate now.
- Ice and water shield covers four zones: eaves past the warm-wall line, full-length valleys, every penetration, and low-slope transitions.
- It solves two problems: ice dam backup at the eaves and wind-driven rain in valleys and around penetrations.
- Michigan code sets a minimum eave distance; a complex roofline or ice-dam history can call for more than the minimum.
- A shorted membrane looks identical to a correct one until the first real ice dam, often months after installation.
- Ask any quote to name the zones by name, and verify placement is part of a proper inspection and reroof.
Questions we hear most
On a Michigan reroof it belongs at the eaves, extending up past the exterior wall line at least to the code minimum; the full length of every valley; around the base of every penetration such as chimneys, skylights, and vent stacks; and across any low-slope transition. Everywhere else on the field of the roof, standard underlayment covers the deck.
No. Underlayment is the secondary water barrier that covers the whole roof deck under the shingles. Ice and water shield is a separate, self-adhering membrane used only in the specific zones where meltwater backup or wind-driven rain is a real risk, such as eaves and valleys. Our underlayment guide covers that product in detail.
From the outside, it is hard to confirm without getting into the details at the eave, valleys, and penetrations, and checking the attic for past staining that would suggest a gap. A free inspection can check the visible evidence and, on a planned replacement, we photograph membrane placement zone by zone as part of the process.
- Michigan Residential Code 2015, section R905.1.2 Ice Barriers: membrane required from the eave edge to not less than 24 inches inside the exterior wall line. up.codes: MRC chapter 9
- FEMA, disaster declaration DR-4757-MI, Michigan severe storms of August 2023 (Macomb County designated). fema.gov/disaster/4757